ABBEY ROAD OBSERVATORY
Telescope Pier Installation Blog
  • Blog
  • About
  • Contact

Step 1. Review idea with wife & get green light

6/26/2014

0 Comments

 
Picture
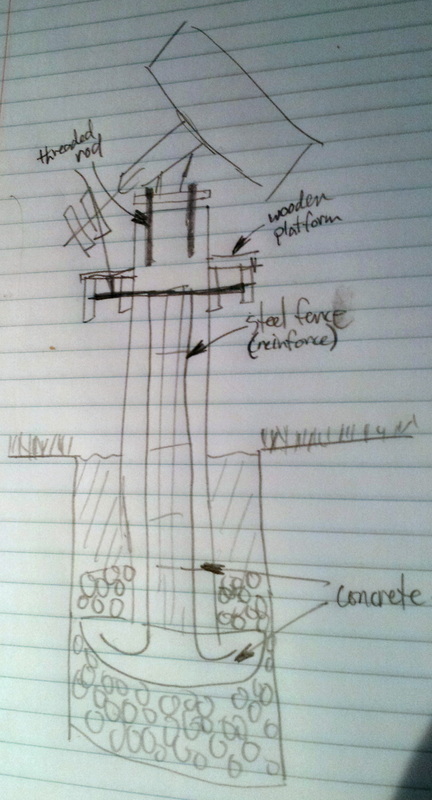
All and all not that hard actually.  My wife is not all that interested in my astronomy hobby, but she is very understanding of how much I enjoy it.  In the end the foot print will be smaller (versus the tripod I use now) plus all the cables will be buried, so the pier should in theory tidy things up quite a bit.

A sketch of my basic idea is to the left.  I will start with some gravel in the hole to provide better drainage and thus hopefully resist heaving.  I will then start the concrete with a pour that takes up pretty much the whole width of the hole.  Inserted in the concrete will be some galvanized steel fencing for reinforcement.  A 10" sonotube will then be lowered into place and braced, with fencing on the interior.  The sonotube will be anchored somewhat by some more gravel.  After all the concrete is poured I'll fill in the rest of the hole with the dirt I took out of the hole.  3/4" threaded rod will be inserted in the top of the pier during the pour, for use in holding the mount.  There will also be 4 x 1/2" threaded rods passing through the pier at 90deg.  These will support a wooden platform which initially will be just a work table to set my laptop on, but will eventually support the clamshell enclosure that I hope to eventually build.  The pier will be in the ground roughly 3' and protrude about 5', placing the mount itself fairly high off the ground (by design).
0 Comments


Leave a Reply.

    Author

    Jim is an aerospace engineer living and working in Ottawa, Canada.  He is also an amateur astronomer.

    Archives

    November 2014
    July 2014
    June 2014

    Categories

    All

    RSS Feed


Powered by Create your own unique website with customizable templates.